The stems view
The track as a mixer and a timeline. Mute, solo, pan and level every part, watch the faders follow the mix through the song, add stems, regenerate one, and change tempo, key and length.
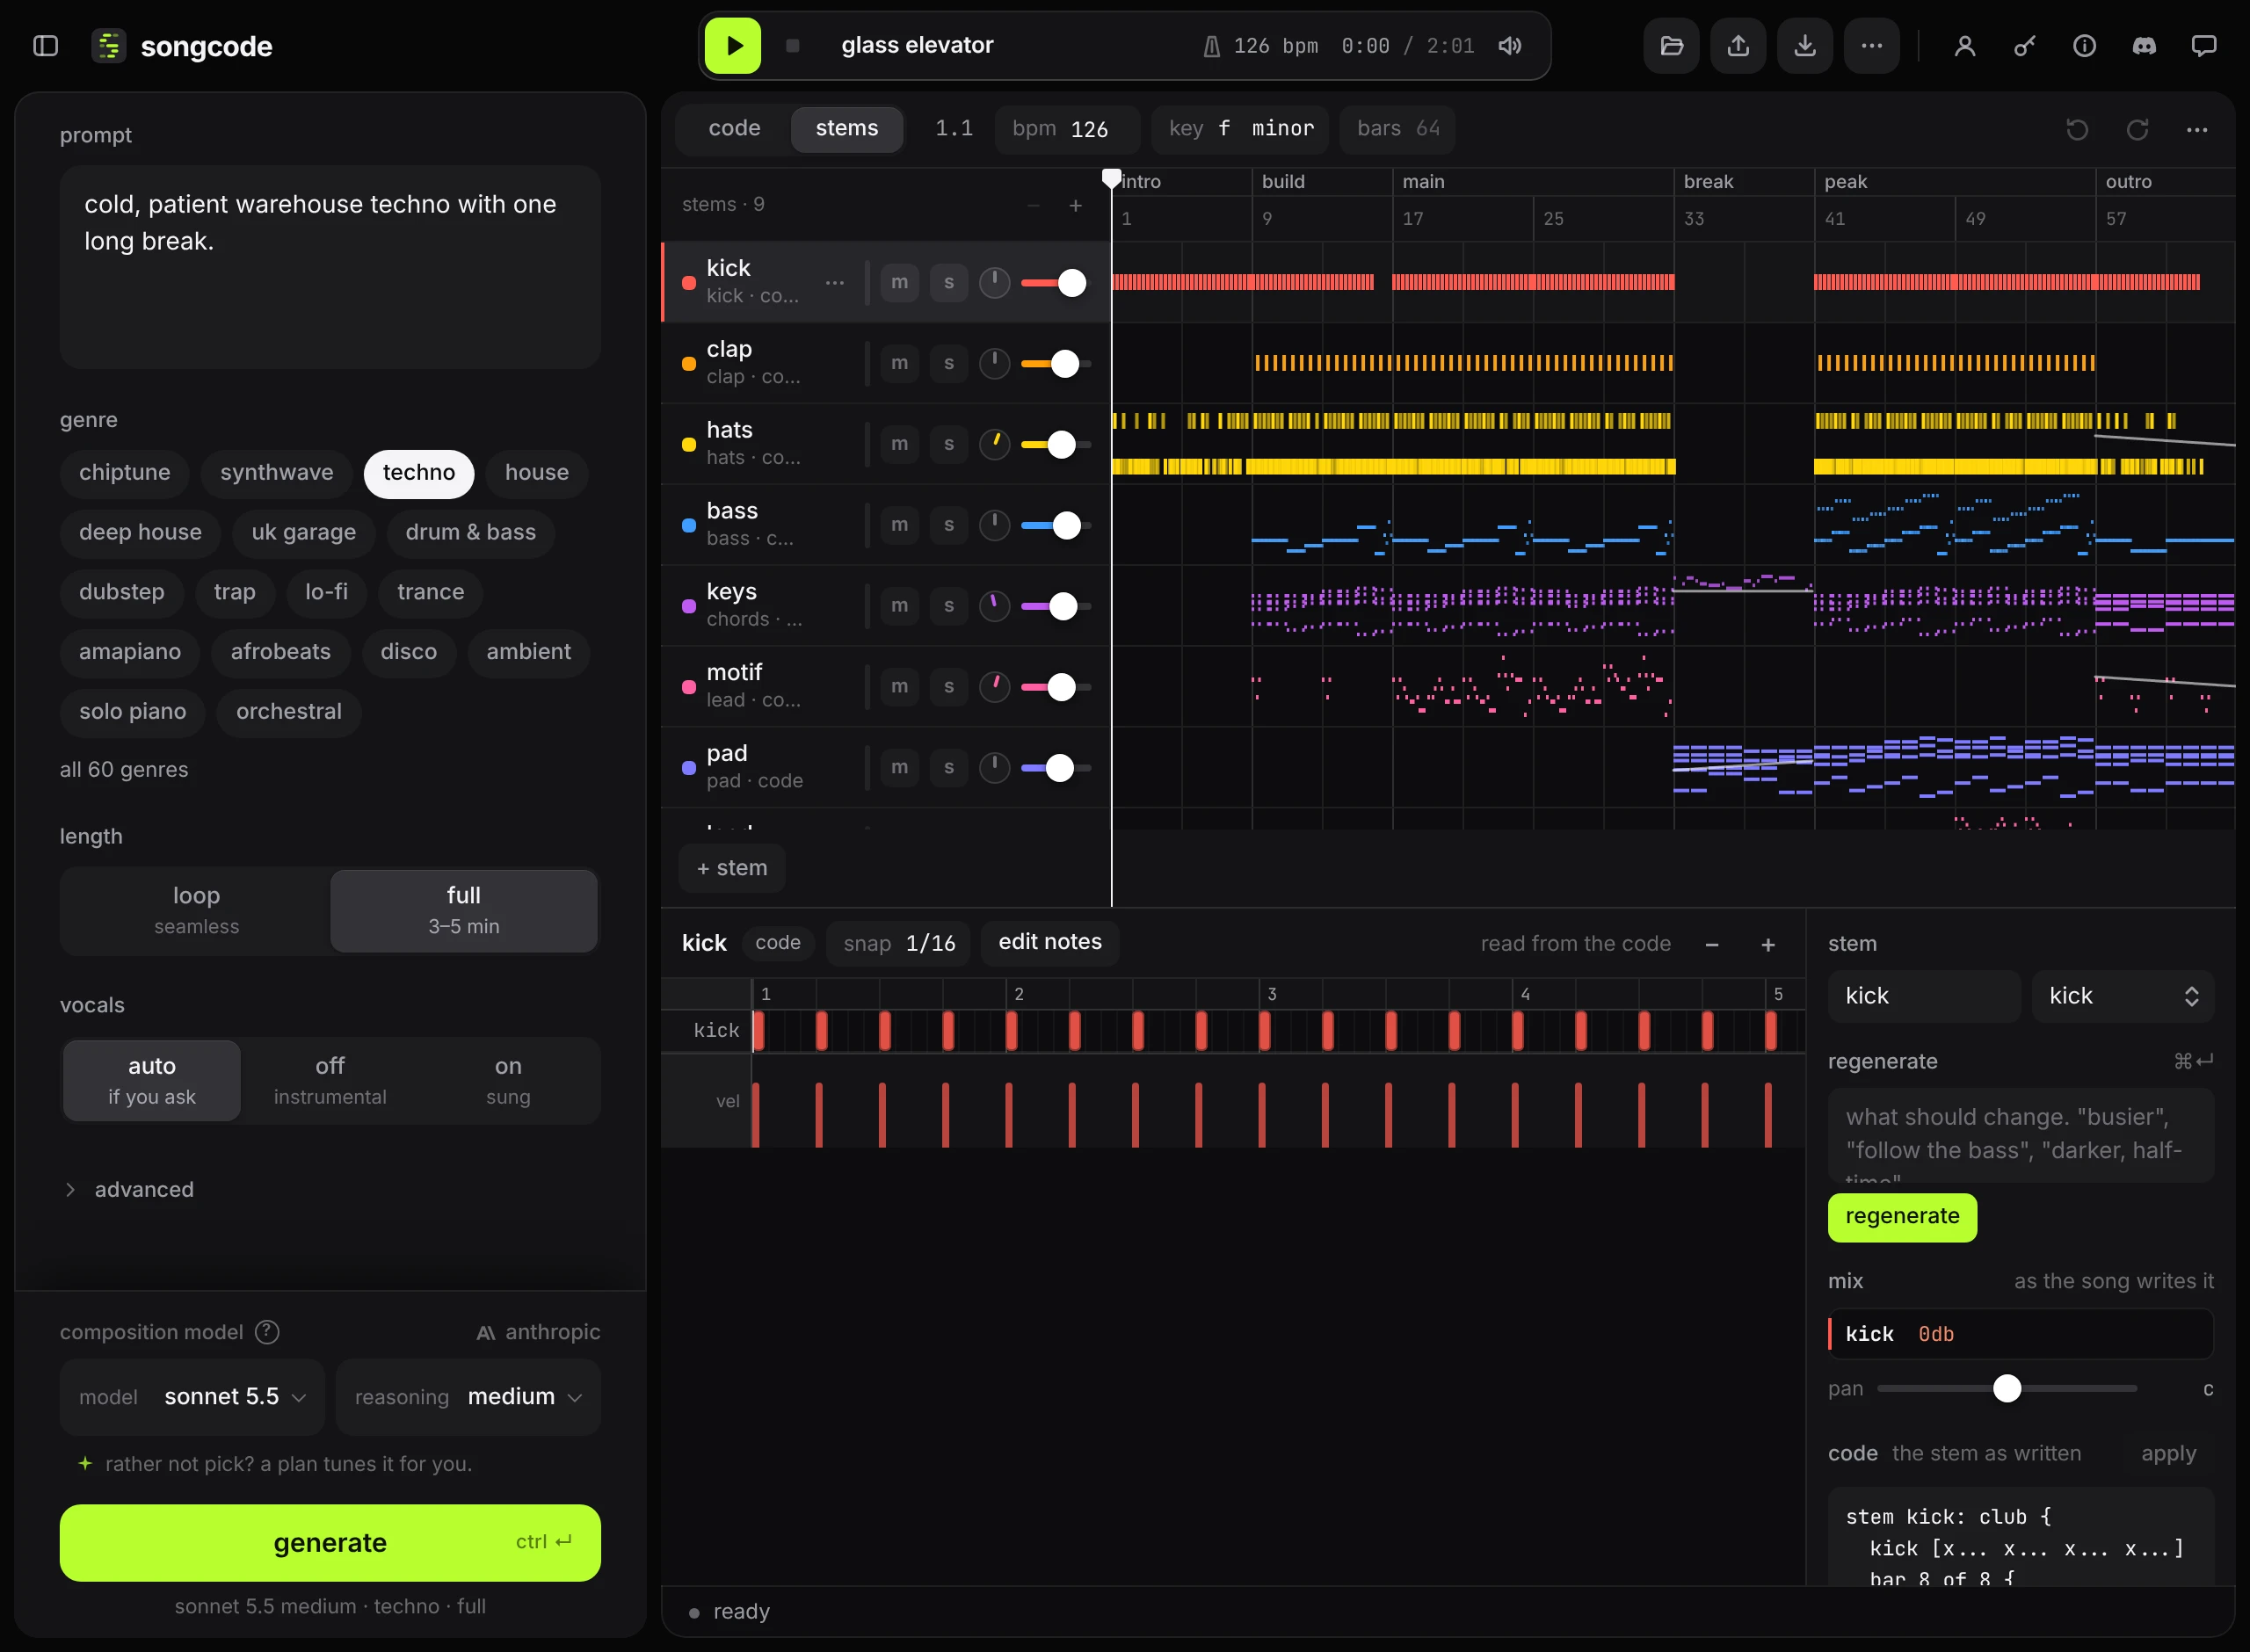
stems on the view switch shows the track as parts. Each stem in the code gets a track with its own mute, solo, pan and level, a lane that shows what it plays, and an editor underneath.
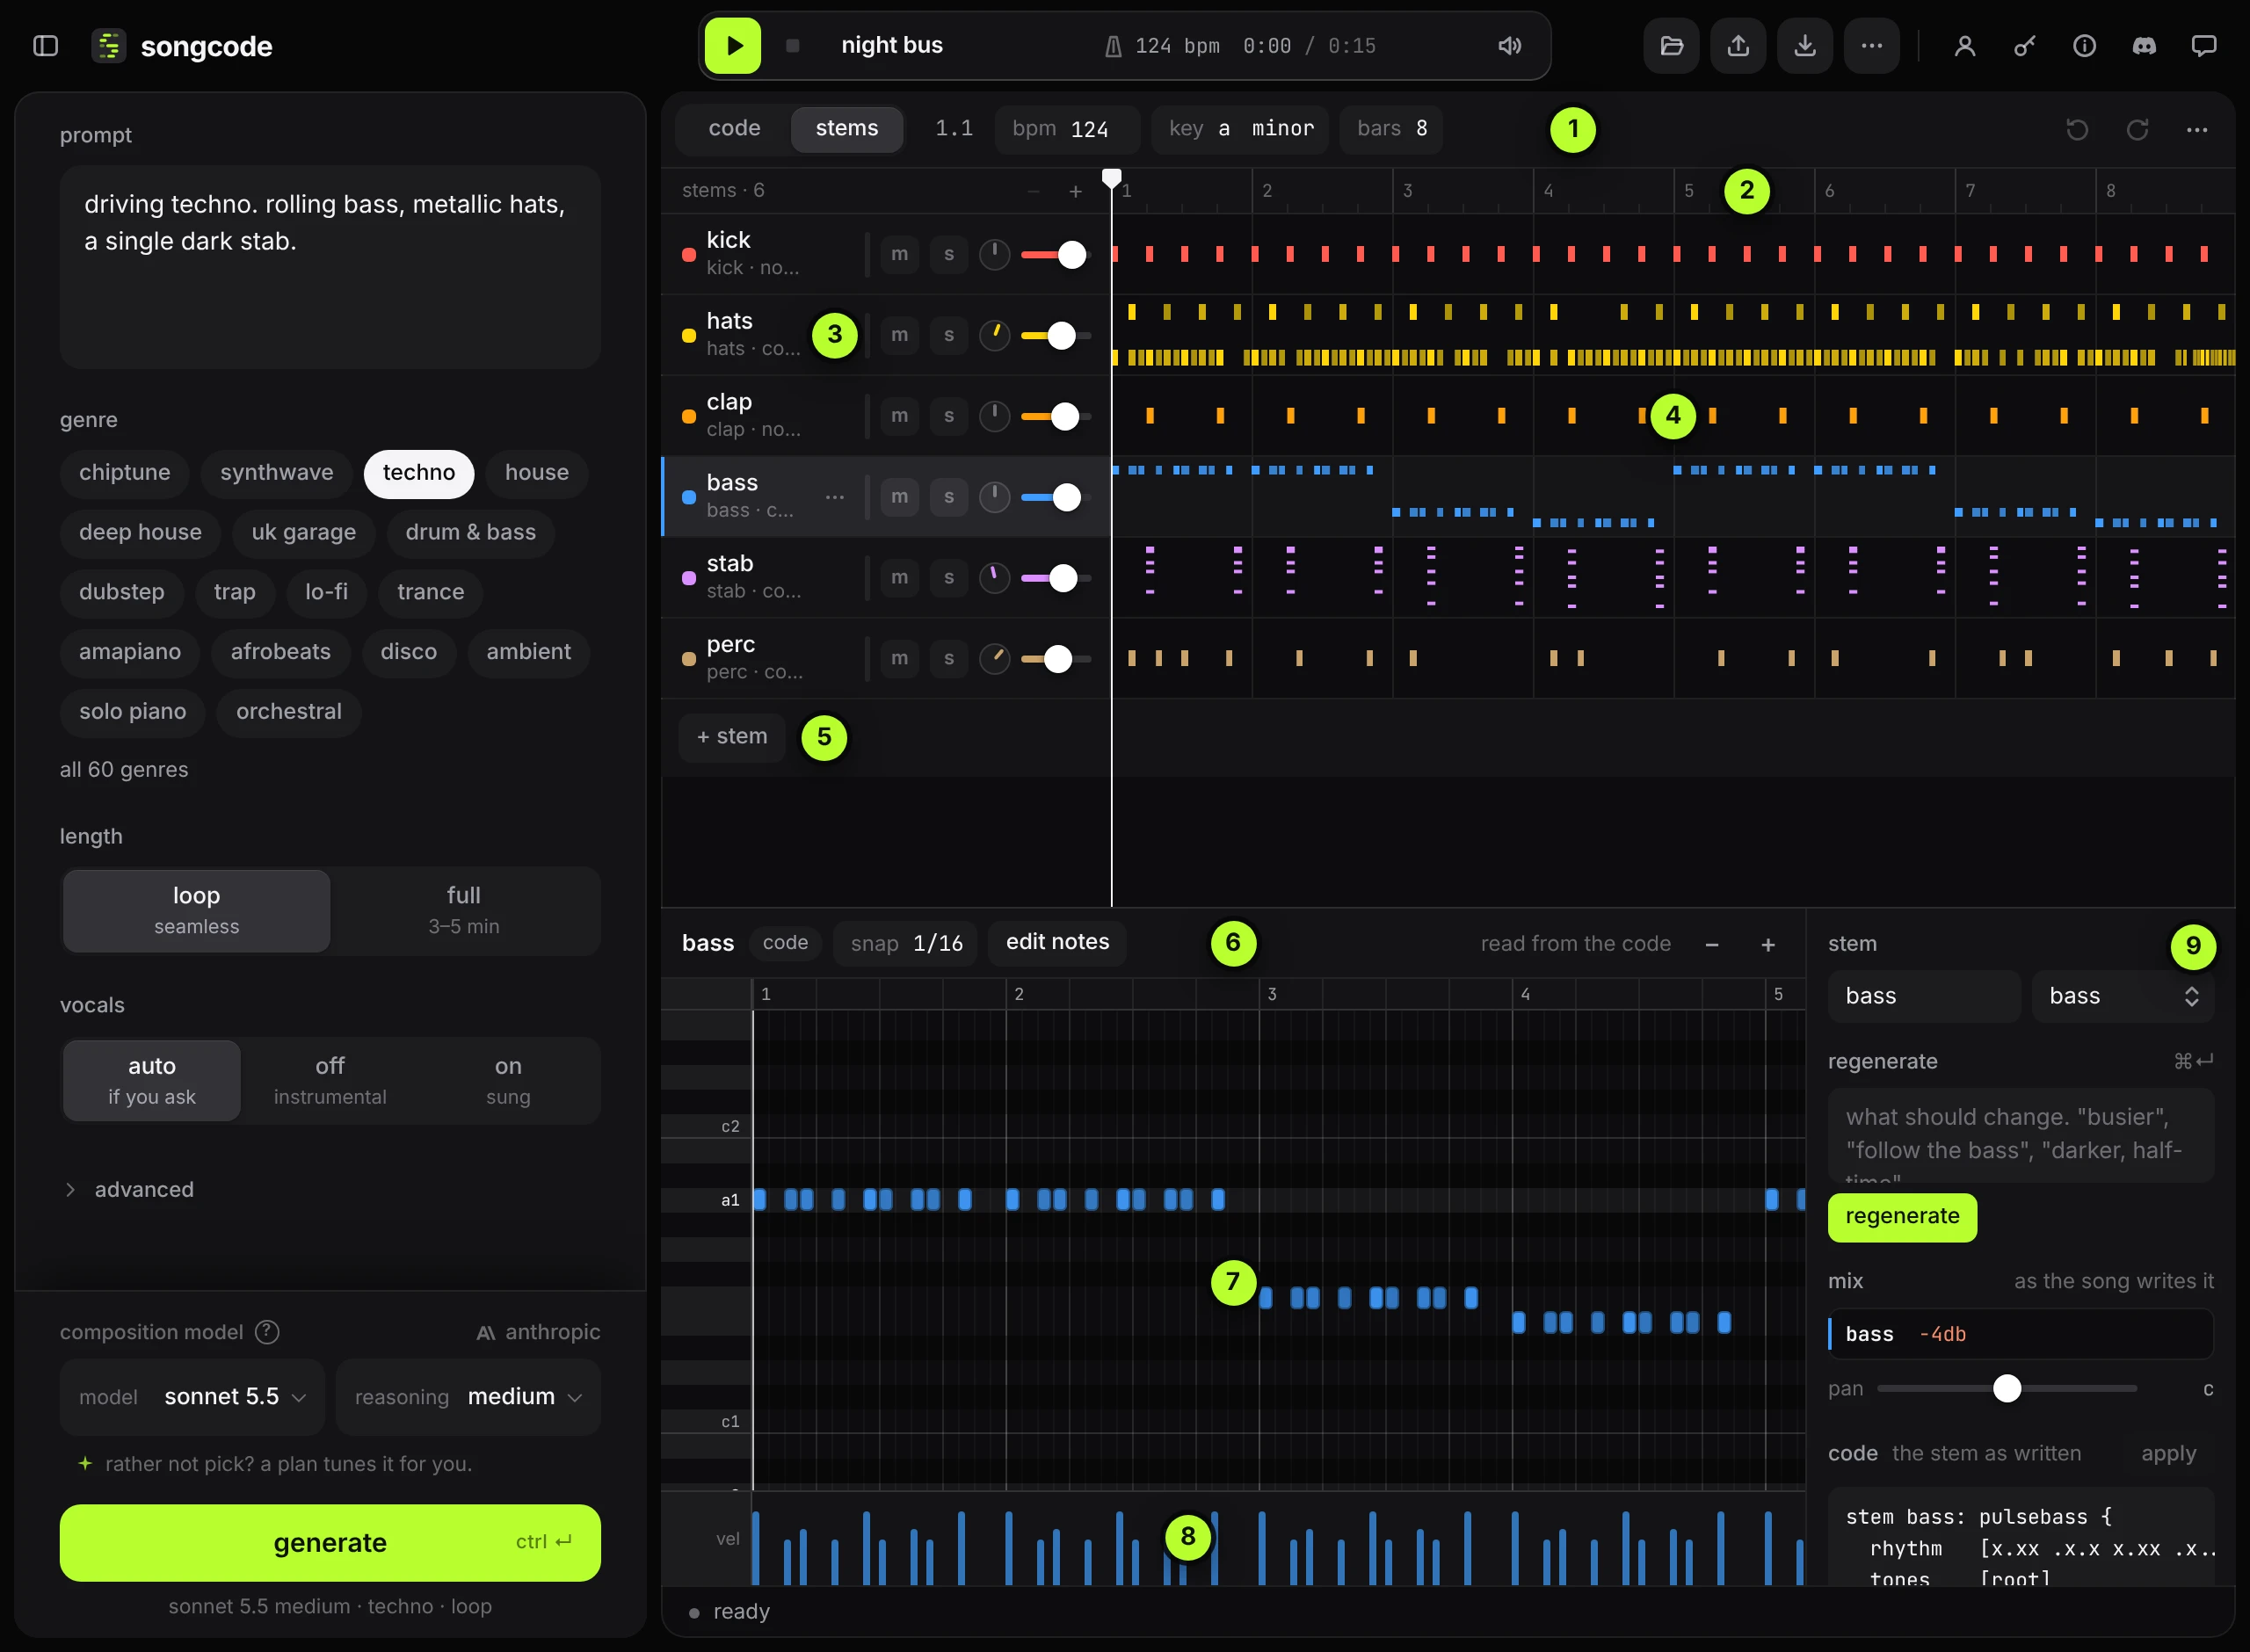
- The song bar. The position, the tempo, the key and the length, with undo, redo and the song menu at the right.
- The timeline. A ruler with bar numbers, and the playhead. Click or drag to move through the song.
- A track header. The stem’s colour and name, what kind of stem it is, its meter, mute, solo, pan and level.
- A lane. Every note the stem plays across the song.
- + stem. Adds a new part.
- The editor tools. The selected stem’s name, whether it is code or notes, the snap, and the zoom.
- The note grid. A piano roll for pitched stems, a drum grid for drums.
- The velocity lane. How hard each note is hit.
- The inspector. Rename the stem, change its role, regenerate it, read its rows of the mix, edit its code.
This page covers the top half: the song bar, the timeline and the tracks. Edit a stem covers the bottom half.
The stems view and the code view show the same track. Anything you do here rewrites the code, and the app remembers which view you were in.
A full-length track is thousands of notes, and reading them all takes a few seconds the first time the stems view opens on it. The status line says reading the song… while that happens. A track that is already playing keeps playing, and the lanes appear when the read is done. After that, an edit reads only the stem it changed.
#Start from nothing
With no track loaded, the stems view offers two ways in.
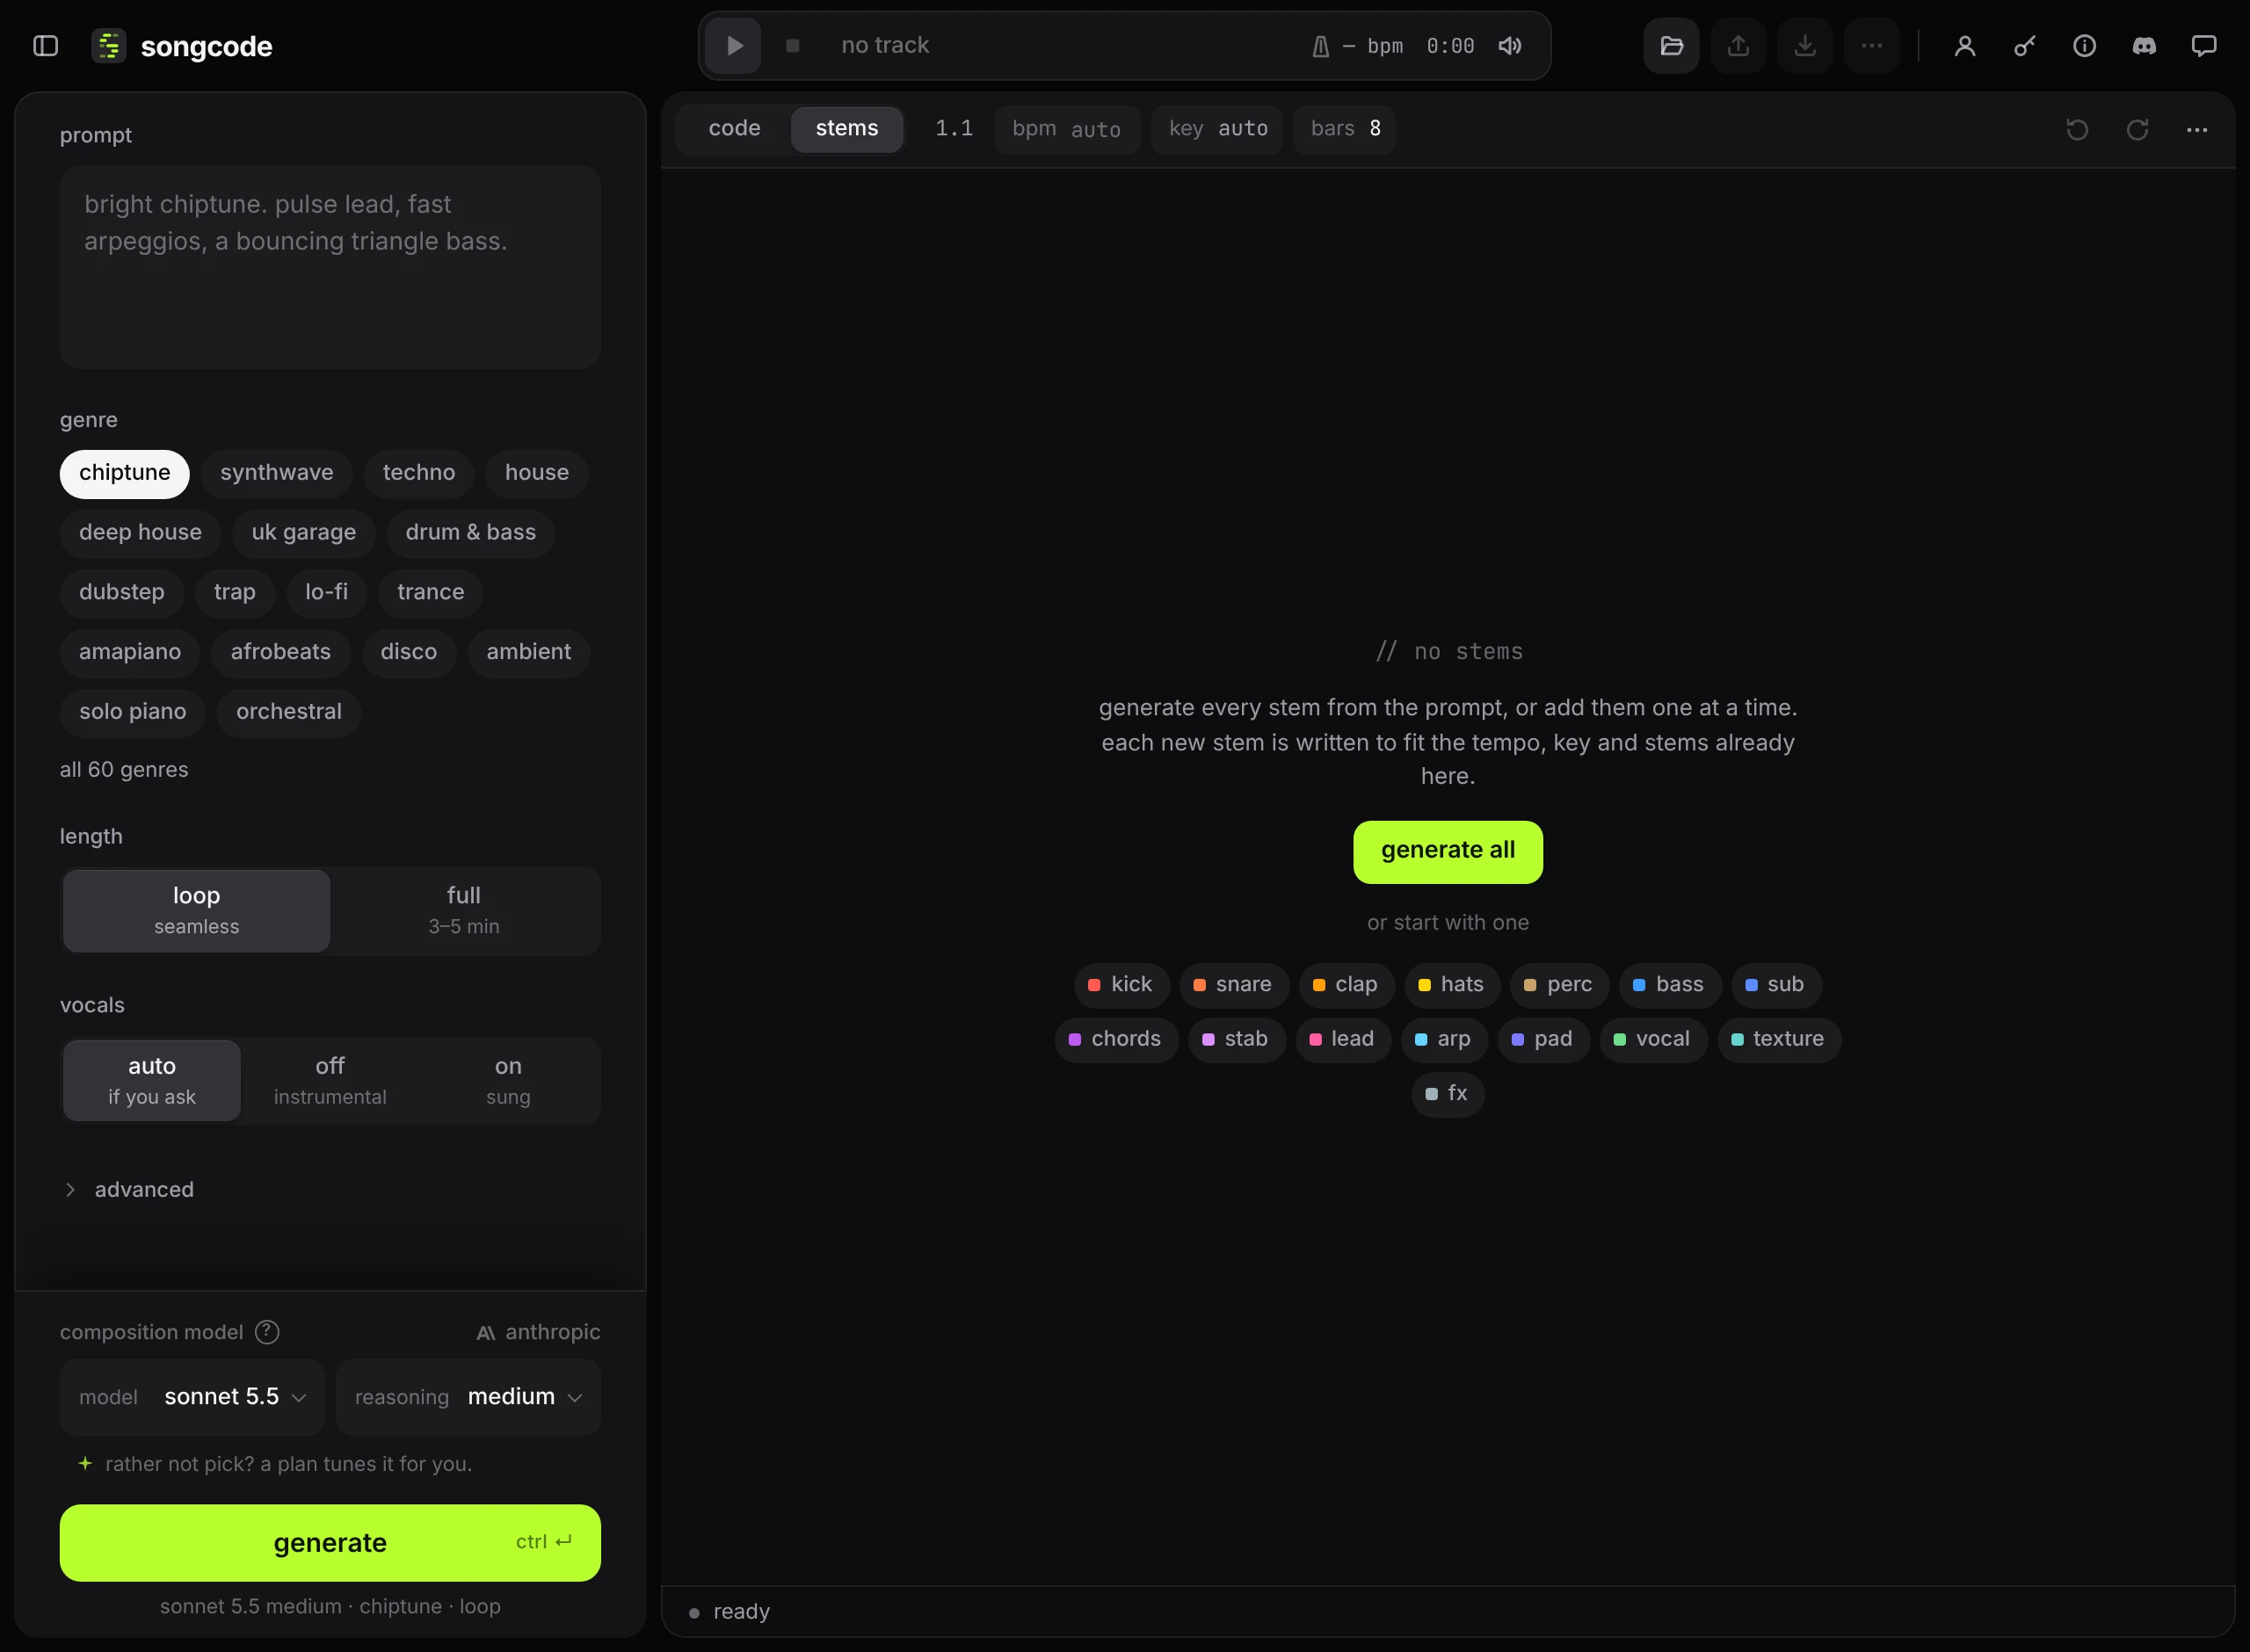
- generate all writes a whole track from the composer’s prompt, genre and length, the same as the generate button.
- or start with one opens the + stem panel so you can build the track a part at a time.
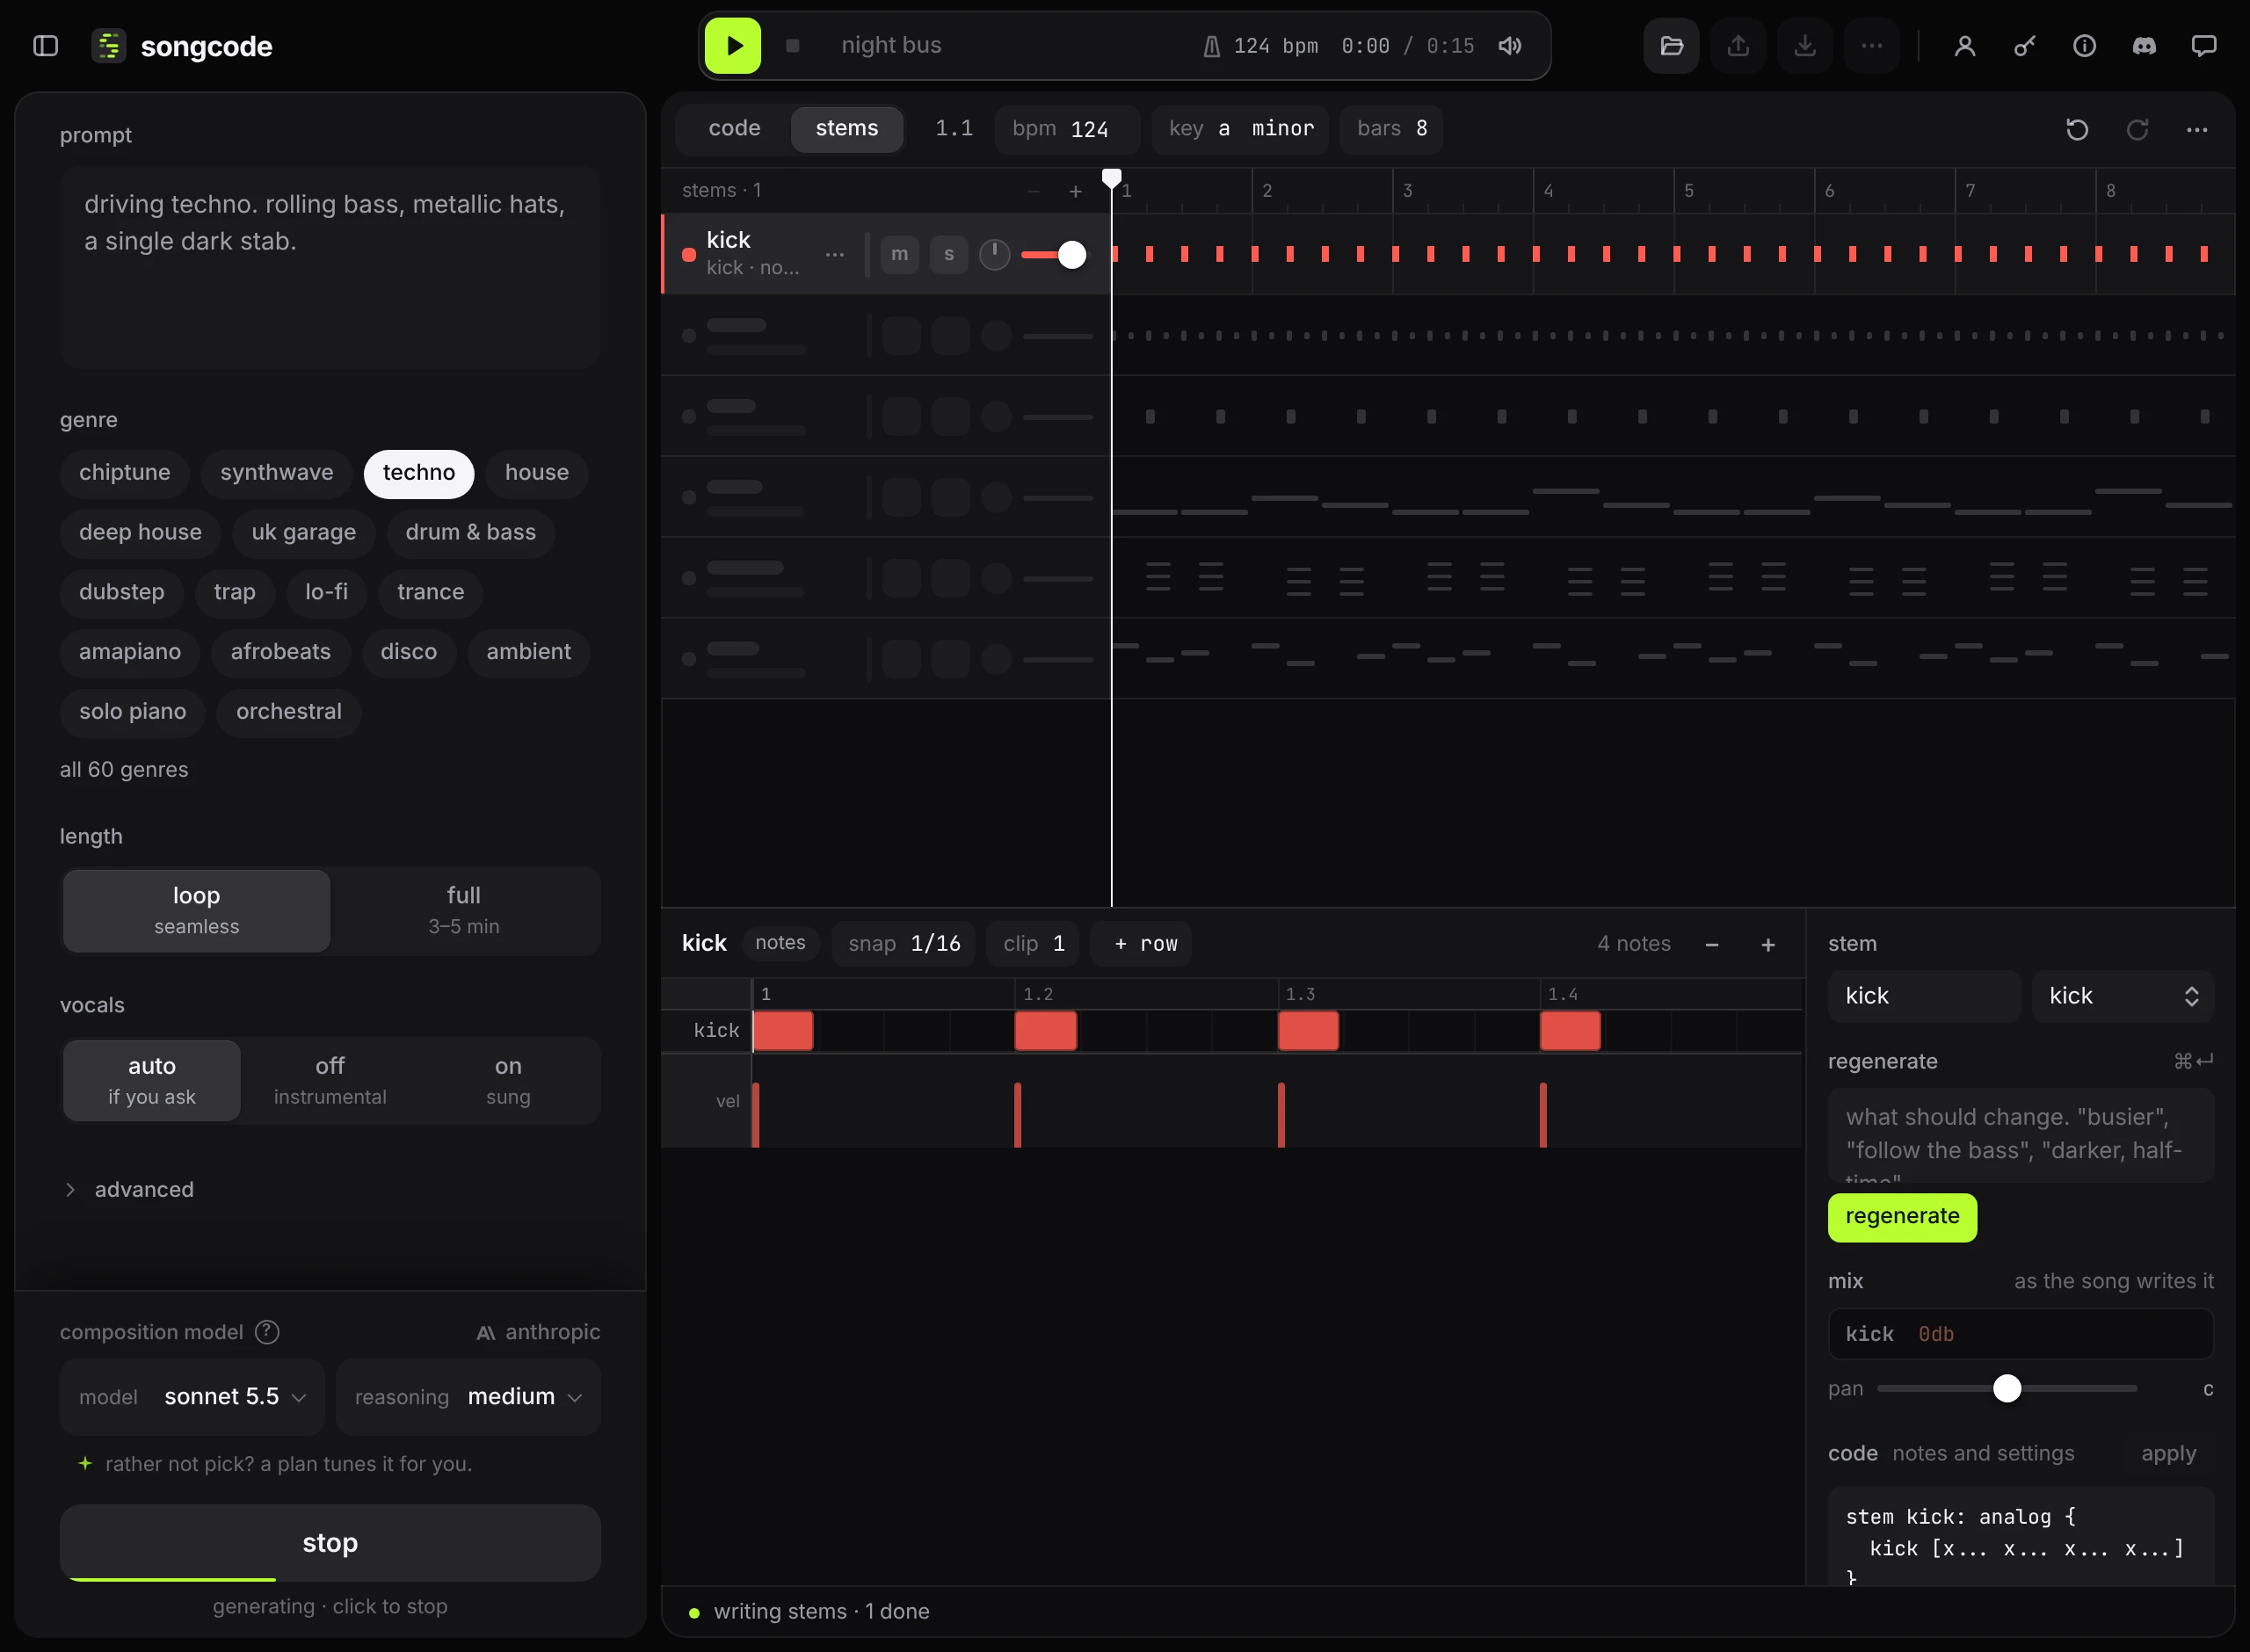
While stems are being written, placeholder rows stand where they will land and fill in as each stem arrives. The status line counts the stems that are done.
#The song bar

- Position.
1.1is bar 1, beat 1. It follows the playhead. - bpm. The tempo, from 40 to 300. Type a number and press ↵. It rewrites the tempo line in the code.
- key. The root note and the scale: minor, major, dorian, phrygian, lydian, mixolydian, locrian, harmonic minor, melodic minor, minor pentatonic, major pentatonic, blues, whole tone, chromatic. A track that does not state its key shows the key Songcode worked out from its notes and its bass line, in a dimmer colour; pick a value to pin it. While a whole track is being written it reads auto, and the key is worked out once every stem is in. After that the reading stays put through edits unless the notes clearly move to another key. New and regenerated stems follow the key. Stems that already exist keep their notes.
- bars. The loop’s length, from 1 to 32. For a full track this is fixed, because the sections decide the length.
- Undo and redo. Every change made in the stems view can be undone: ⌘Z, and ⇧⌘Z or ctrl Y to redo. The shortcuts work anywhere in the window except inside a text field, which keeps its own undo.
- … is the song menu.
#The song menu
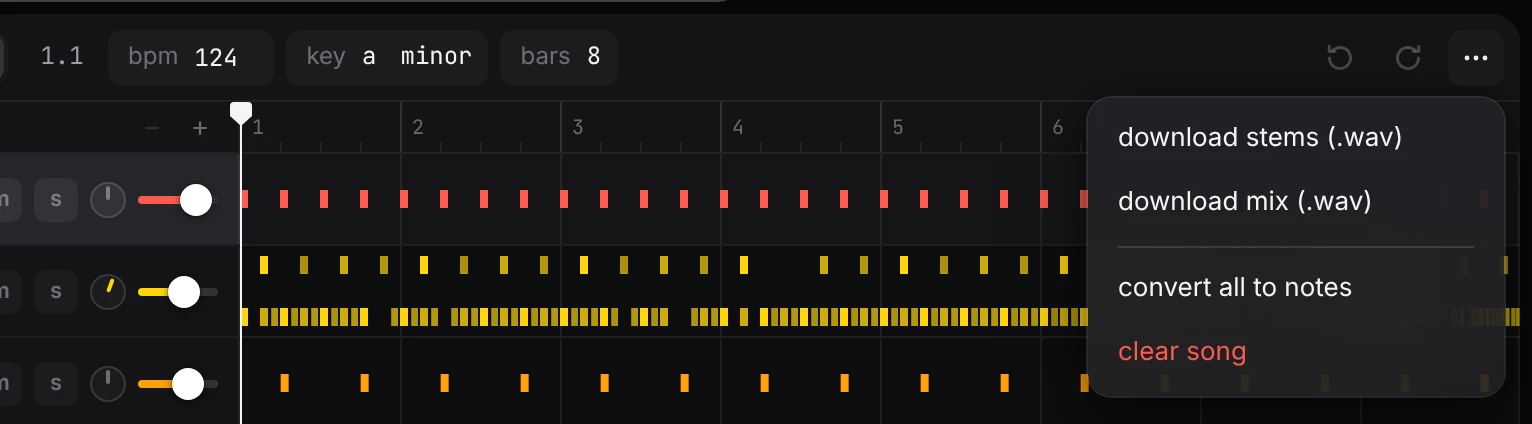
- download stems (.wav) renders every stem to its own WAV file, so you can mix the track in other software.
- download mix (.wav) renders the whole track to one WAV, with your levels, pans and mutes applied.
- convert all to notes writes every stem out as notes you can move by hand. See code and notes.
- clear song removes every stem. Undo brings them back.
Both downloads are rendered in your browser. Download and export has the details.
#The timeline
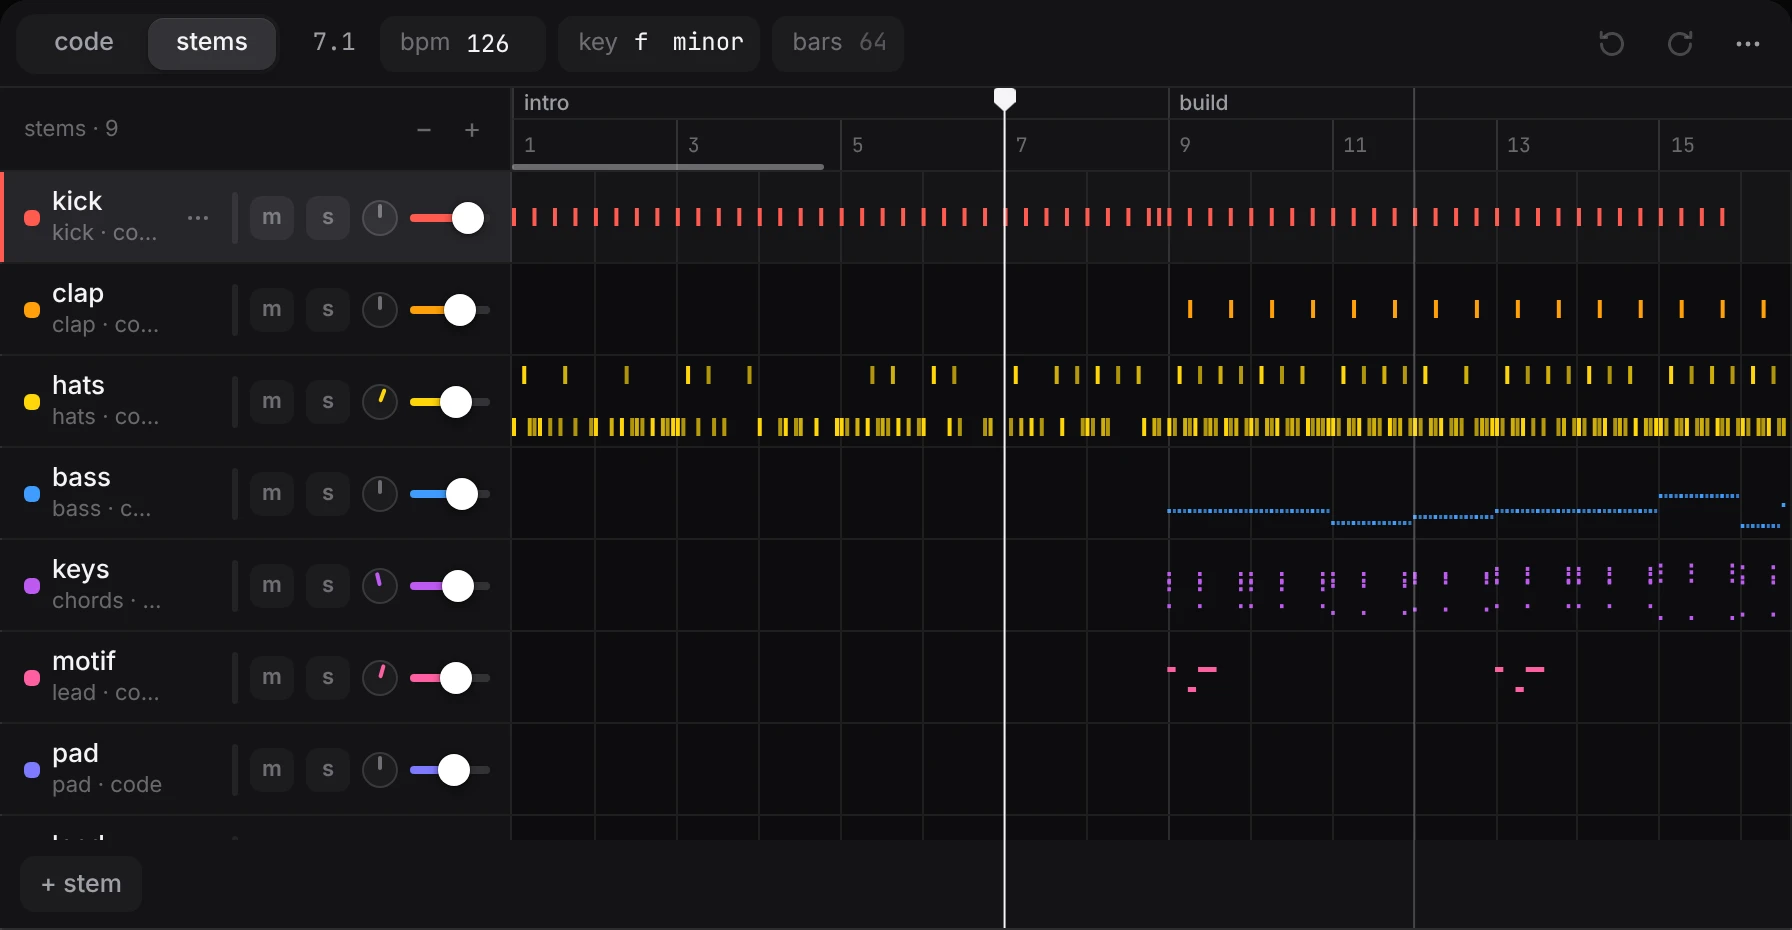
The ruler above the lanes shows bar numbers. For a full track it also shows the section names along the top, and the lines between sections run down through the lanes.
#Move through the song
- Click the ruler to put the playhead there. Drag to scrub; while the track plays, the sound follows.
- The playhead snaps to bars, or to beats when you are zoomed in far enough. Hold alt to place it freely.
- ← and → step one bar. With shift they step one beat. home goes back to the start.
- The playhead is always shown, playing or not. Stopped, it marks where the next play starts.
The arrow keys move the playhead only when the note grid, a slider or a menu does not have the focus; those keep the arrows for themselves.
#Zoom and scroll
- − and + at the left of the ruler zoom out and in. So does ⌘ with the scroll wheel, or a pinch on a trackpad, centred on the pointer.
- Scroll sideways, or hold shift and scroll, to move along a zoomed song. Or drag the lanes left and right.
- When zoomed in, a bar under the ruler shows which part of the song is in view. Drag it to look somewhere else.
- While the track plays, the lanes turn the page to keep up with the playhead. Scroll away by hand and they stay where you put them until the playhead comes back into view.
Opening a different track always starts zoomed all the way out.
#Tracks
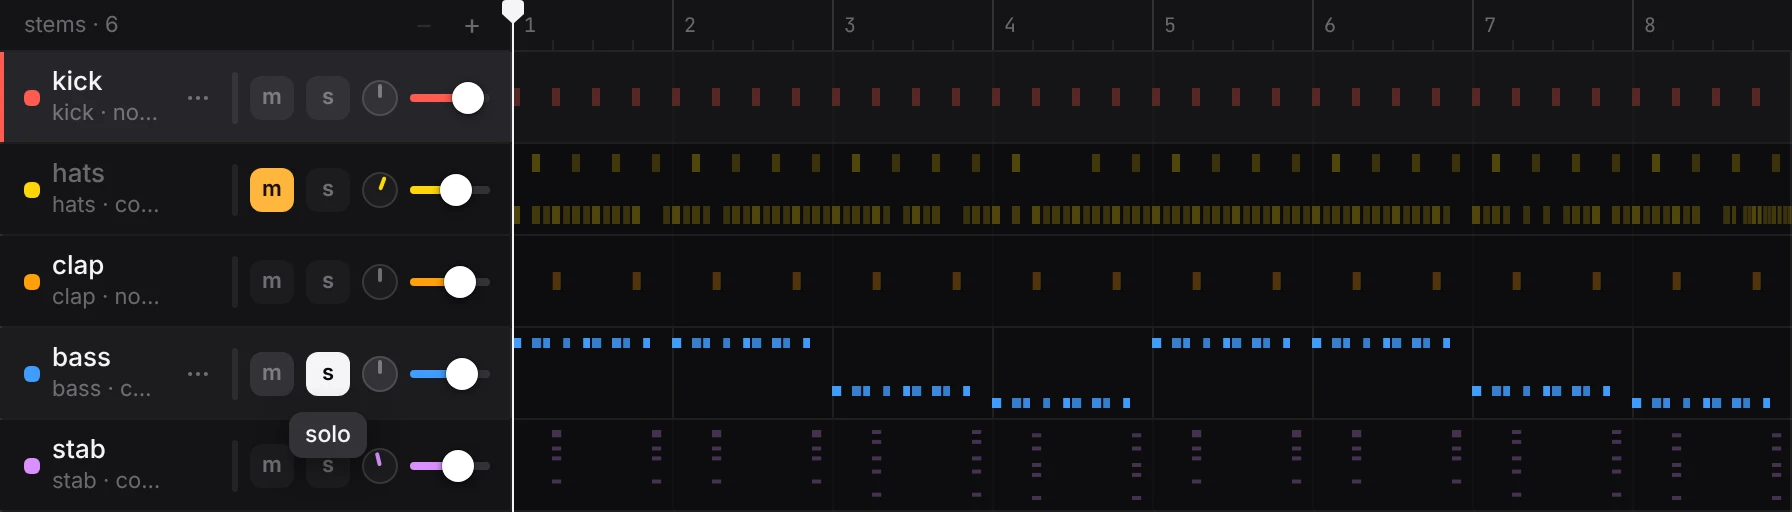
Each header has, from left to right:
- The colour dot and the name. The colour comes from the stem’s role. Under the name is the role and whether the stem is
codeornotes. - … on the selected or hovered track opens the stem menu.
- The meter. That stem’s level while the track plays.
- m mutes the stem. s solos it: only soloed stems are heard. Several stems can be soloed at once. The lane of a stem you cannot hear, muted or left out by a solo, is dimmed.
- The pan knob places the stem between the left and right speakers. Drag it sideways, or up and down. Hold shift for finer steps. Double-click it to return to the centre. With the keyboard on it, the arrow keys move it by 1 and shift with an arrow by 10.
- The level slider, in decibels from -36 to +6. Double-click it to go back to 0db.
Click a track to select it. The editor below then shows that stem.
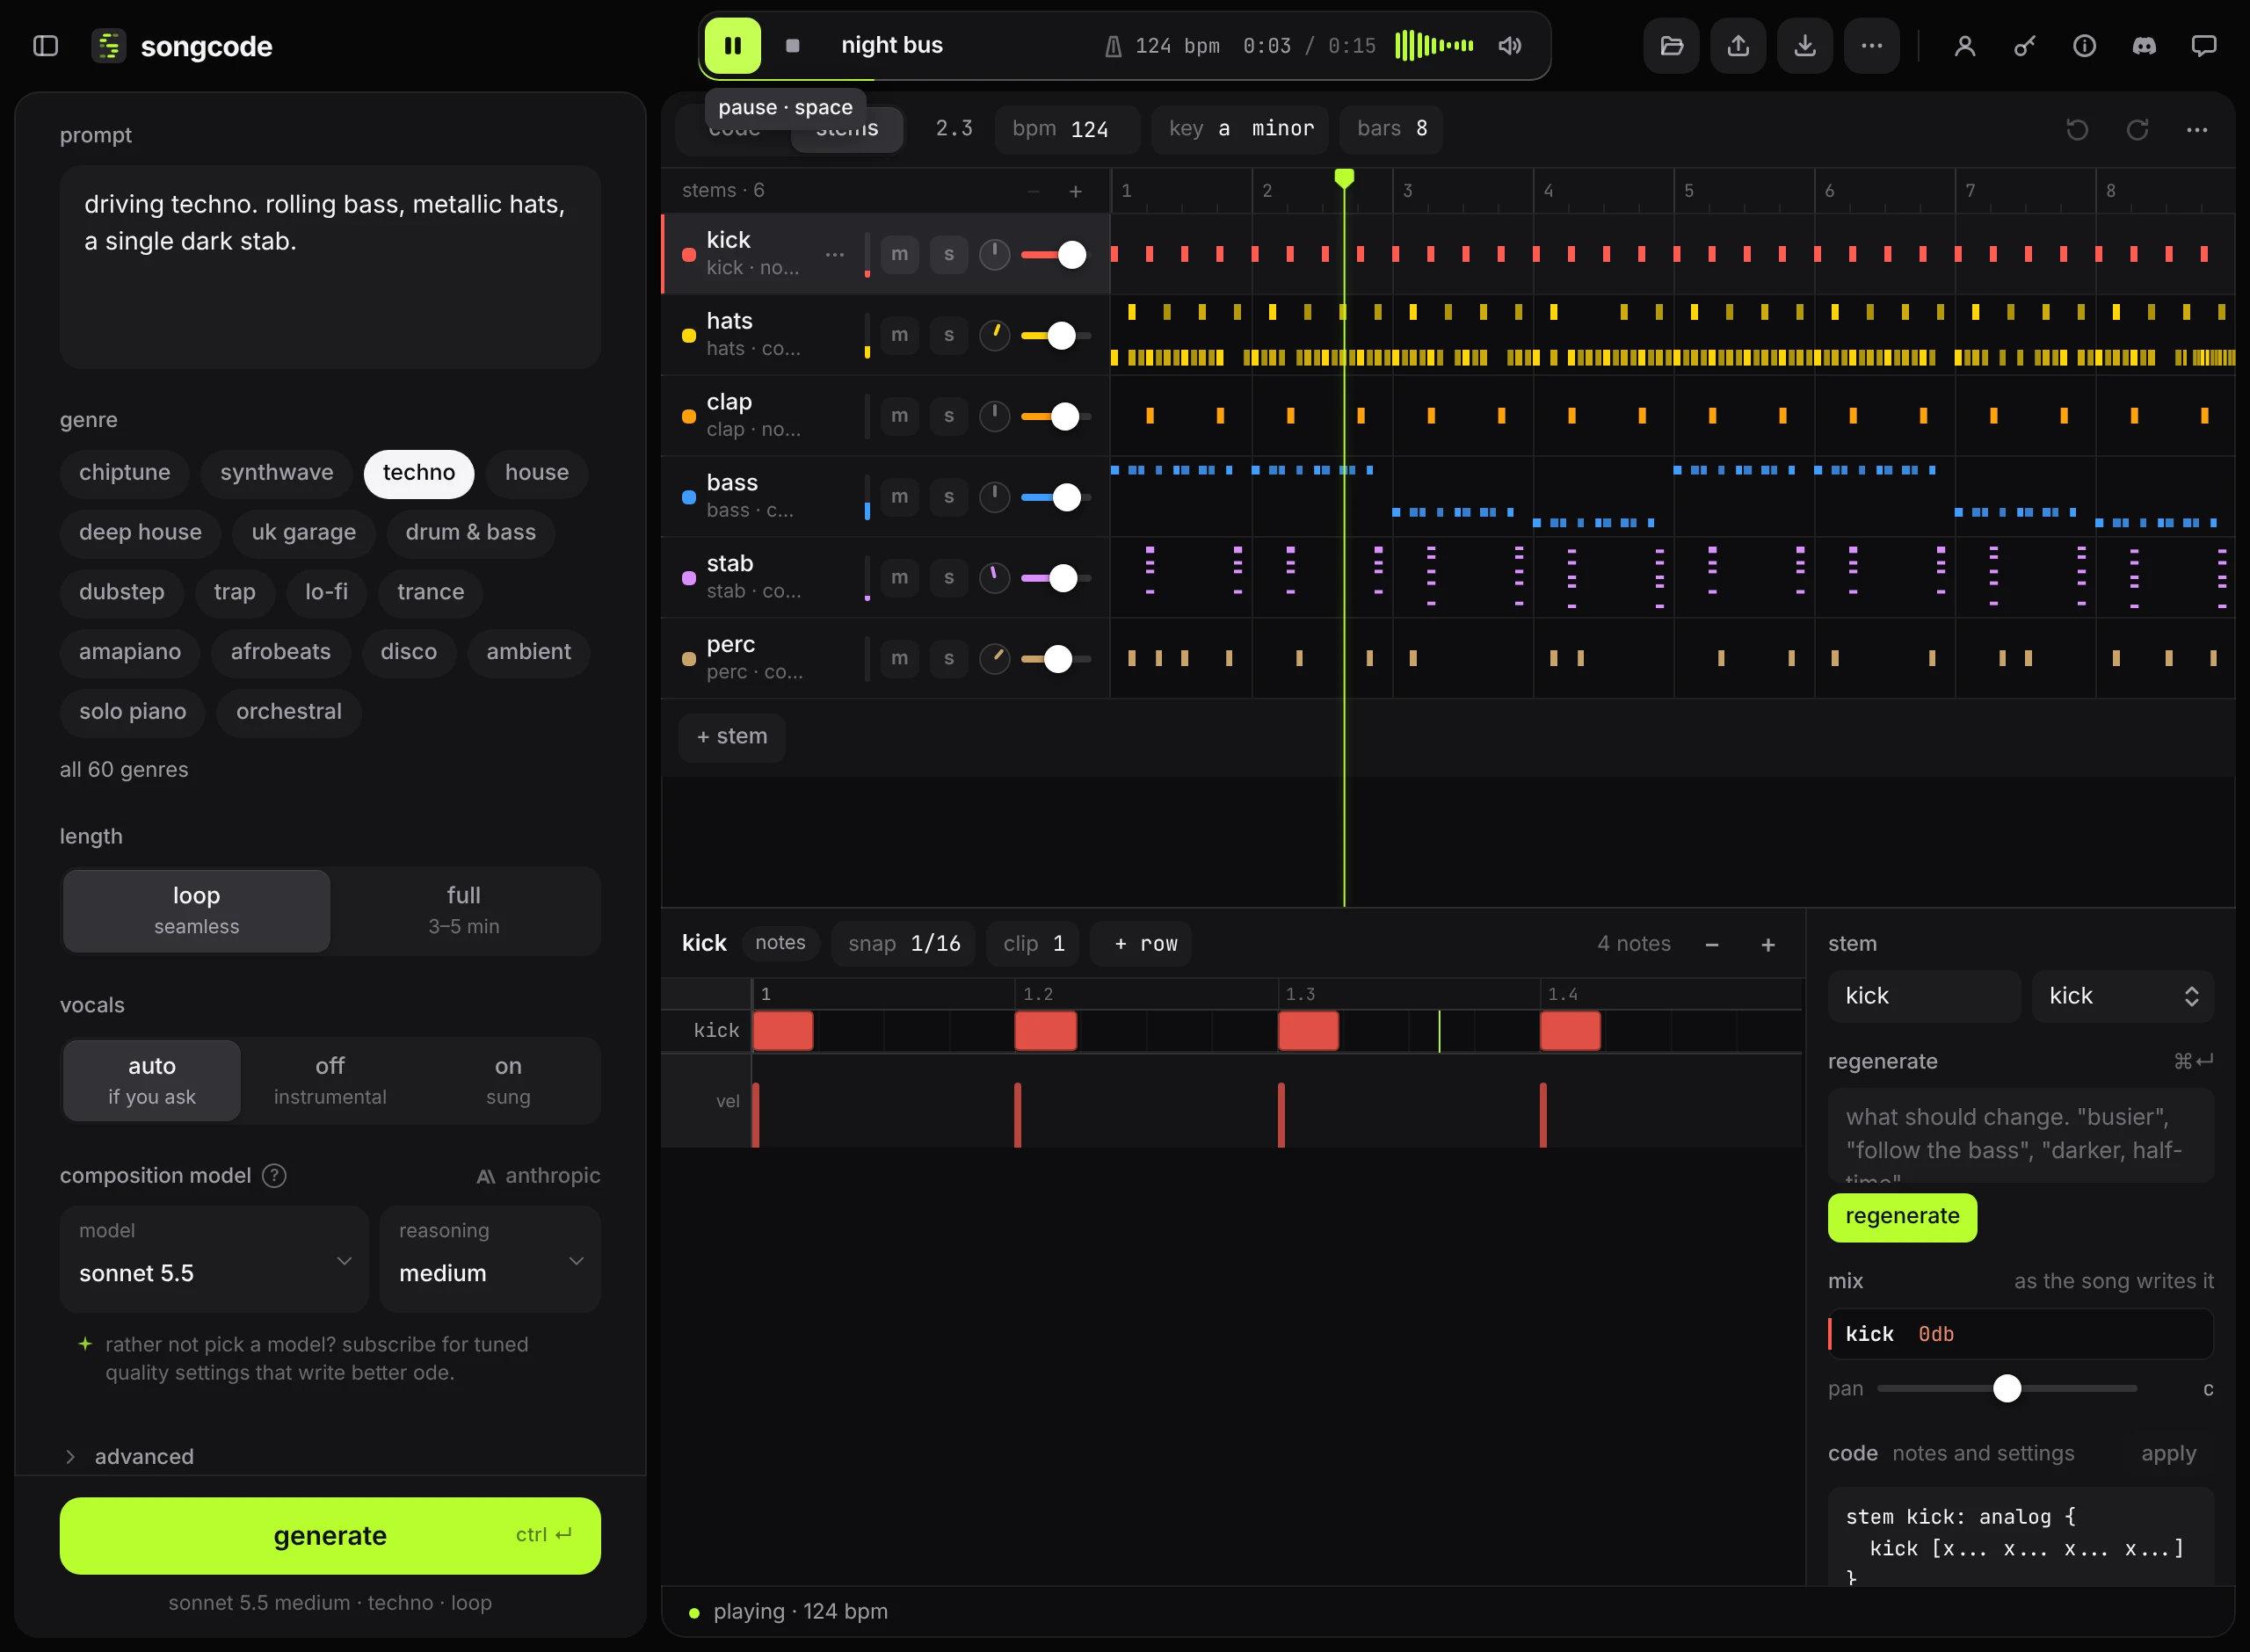
Level, pan and mute are written into the track’s mix table, so the controls and the code always agree. Change a row in the code view and the fader stands there when you come back. Solo is for listening and is not saved. The download button’s WAV and MP3, and download mix, include your levels, pans and mutes.
#A mix that moves
A track’s mix table can change through the song: a pad that rises through the break, a lead that sweeps from left to right, a fade at the end. The controls show it. As the playhead moves, each fader, pan knob and mute button stands where the song has it at that bar, while the track plays and while you drag through it stopped.
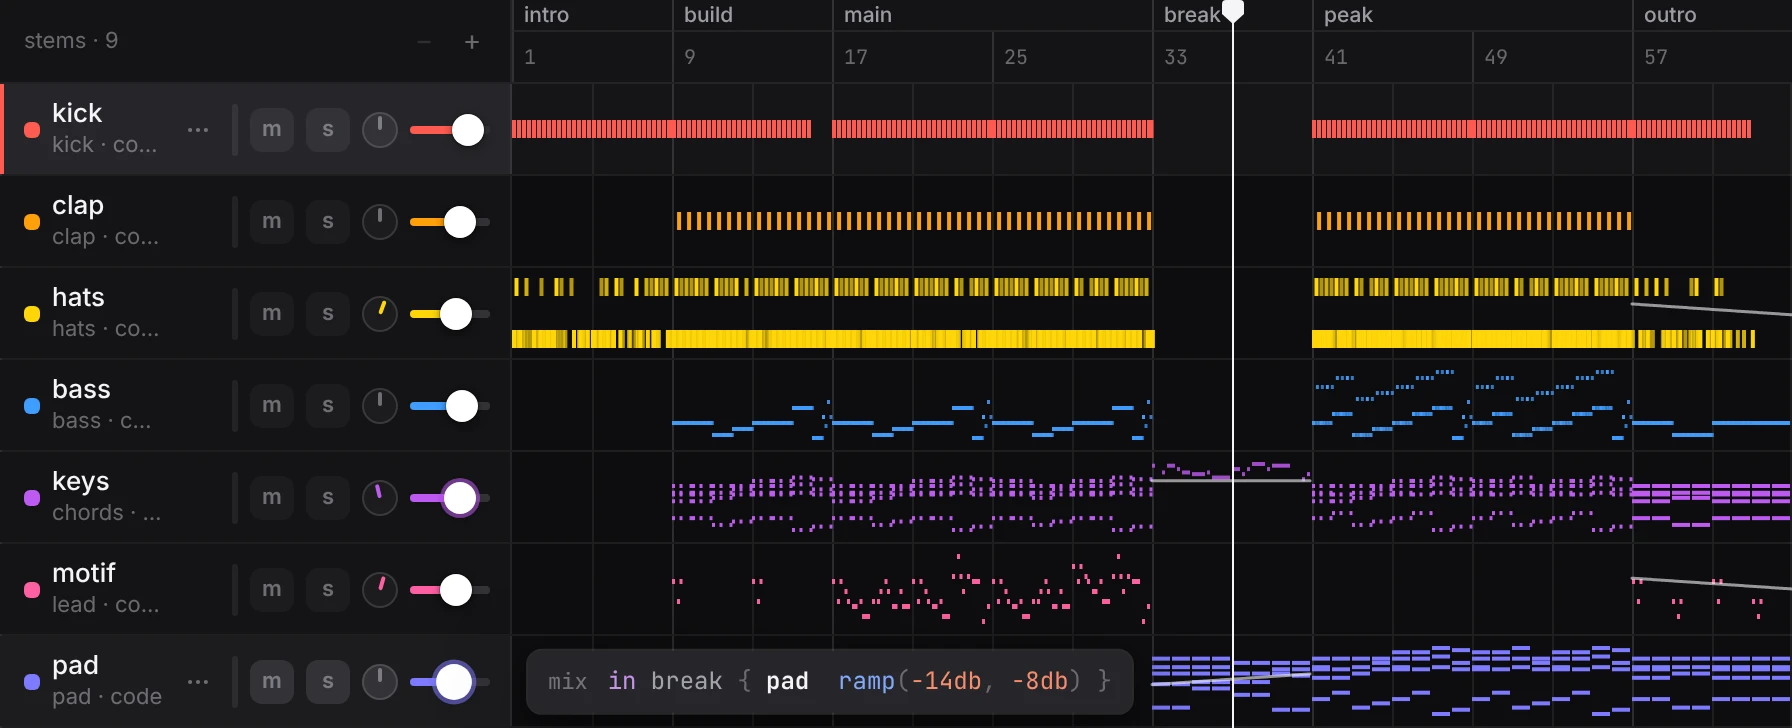
- A ring on a fader means a block of the mix, or a fade, is moving that stem at the playhead. Hover it to read which one.
- A line across a lane is the fader’s path over those bars: up is louder.
- A hand on a control writes the row in force at the playhead. In the break, where
in break { pad ramp(-17db, -11db) }sets the pad, dragging the pad’s fader moves both ends of that ramp and keeps its shape. Outside any block it writes the stem’s own row at the top of the table. To change another part of the song, move the playhead there first. - The line being written shows beside the track while you hold the control, as it will read in the code.
- m on a stem a block has muted takes that mute out of the block. Muting a stem always mutes it for the whole track.
#Groups and master
A track that names a group in its code, group drums: kick, clap, hats, gets a strip for it under the stems, with a meter, m and a level that act on every stem in the group. Its row in the mix table is written the same way as a stem’s.
When a block of the mix moves the whole track, as in last 4bars into end { master fade out }, a master strip stays in view above + stem. Its fader follows the fade, and can be moved inside the bars that block covers. Elsewhere it is dimmed: master moves only inside a block.
#The stem menu
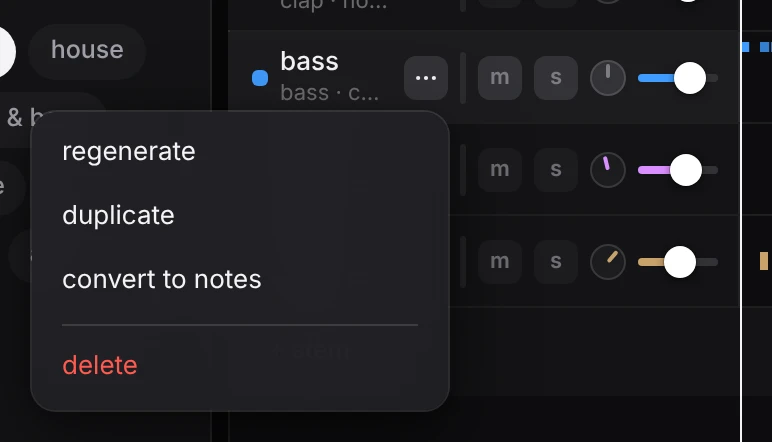
- regenerate asks the model to rewrite this one stem so that it fits the others, straight away and with no direction. To say what should change, use regenerate in the inspector.
- duplicate copies the stem under a new name.
- convert to notes writes the stem out as notes you can edit by hand.
- delete removes the stem. Undo brings it back.
#Add a stem
+ stem sits at the bottom of the tracks and stays in view however many stems the track has. It opens a panel.
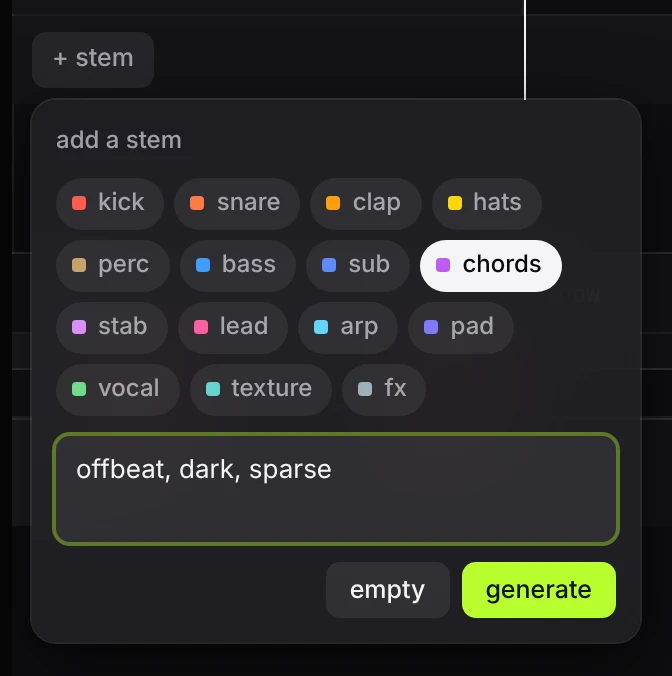
- Pick a role. There are 15: kick, snare, clap, hats, perc, bass, sub, chords, stab, lead, arp, pad, vocal, texture, fx. The role decides the colour, the kind of editor, and what the model is asked to write.
- Optionally type a direction, such as “offbeat, dark, sparse”.
- Press generate to have the model write the stem to fit the track, or empty to get a blank one to draw into.
A generated stem uses your key and the model selected in the composer. It is given the rest of the track, so it fits the key, the tempo and what is already playing. An empty stem needs no key.
The new stem is selected, and the track list scrolls to it if it lands out of view.
The roles, and the sound an empty stem of each starts with, are listed on edit a stem.
#Play
The transport in the top bar plays the stems view too. space plays and pauses. Changes you make while it plays are heard at once: there is no update button to press here.
#Drafts and publishing from the stems view
Changes here are kept in the draft the same way as in the code view: a new stem, a regenerated stem, a level, pan or mute. publish works the same too. A track last worked on in the stems view opens in the stems view, with its levels, pans and mutes as you left them.